
ELISA Test – ELISA (enzyme-linked immunosorbent assay) is a plate-based assay technique designed for detecting and quantifying peptides, proteins, antibodies, and hormones. In an ELISA, an antigen must be immobilized to a solid surface and then complexed with an antibody that is linked to an enzyme.
Detection is accomplished by assessing the conjugated enzyme activity via incubation with a substrate to produce a measurable product. The most crucial element of the detection strategy is a highly specific antibody-antigen interaction.
ELISAs are typically performed in 96-well (or 384-well) polystyrene plates, which will passively bind antibodies and proteins. It is this binding and immobilization of reagents that makes ELISAs so easy to design and perform. Having the reactants of the ELISA immobilized to the microplate surface makes it easy to separate bound from non-bound material during the assay.
This ability to wash away non specifically bound materials makes the ELISA a powerful tool for measuring specific analytes within a crude preparation.
General ELISA Procedure
Unless you are using a kit with a plate that is pre-coated with antibody, an ELISA begins with a coating step, in which the first layer, consisting of a target antigen or antibody, is adsorbed onto a 96-well polystyrene plate.
This is followed by a blocking step in which all unbound sites are coated with a blocking agent. Following a series of washes, the plate is incubated with the enzyme-conjugated antibody. Another series of washes remove all unbound antibody. A substrate is then added, producing a colorimetric signal. Finally, the plate is read.
Because the assay uses surface binding for separation, several washes are repeated in each ELISA step to remove unbound material. During this process, the excess liquid must be removed to prevent the dilution of the solutions added in the next assay step. To ensure uniformity, specialized plate washers are often used.
ELISAs can be quite complex and include multiple intervening steps, especially when measuring protein concentration in heterogeneous samples such as blood. The most complex and varying step in the overall process is detection, where multiple layers of antibodies can be used to amplify the signal.

ELISA Types
ELISAs can be performed with several modifications to the basic procedure: direct, indirect, sandwich or competitive. The key step, immobilization of the antigen of interest, can be accomplished by direct adsorption to the assay plate or indirectly via a capture antibody that has been attached to the plate. The antigen is then detected either directly (enzyme-labeled primary antibody) or indirectly (enzyme-labeled secondary antibody).
The detection antibodies are usually labeled with alkaline phosphatase (AP) or horseradish peroxidase (HRP). A large selection of substrates is available for performing the ELISA with an HRP or AP conjugate. The choice of substrate depends upon the required assay sensitivity and the instrumentation available for signal-detection (Spectrophotometer, fluorometer or luminometer).
Among the standard assay formats discussed and illustrated below, where differences in both capture and detection were the concern, it is important to differentiate between the particular strategies that exist specifically for the detection step.
However, an antigen is captured to the plate (by direct adsorption to the surface or through a pre-coated “capture” antibody, as in a sandwich ELISA), it is the detection step (as either direct or indirect detection) that largely determines the sensitivity of an ELISA.
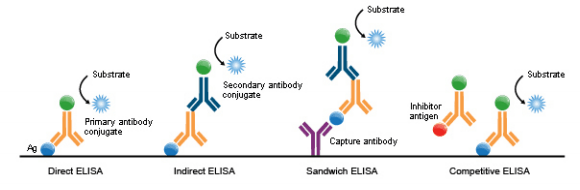
1. Direct ELISA
For direct detection, an antigen-coated to a multi-well plate is detected by an antibody that has been directly conjugated to an enzyme. This detection method is a good option if there are no commercially available ELISA kits for your target protein.
Advantages:
- Quick because only one antibody and fewer steps are used.
- Cross-reactivity of the secondary antibody is eliminated.
Disadvantages:
- Immunoreactivity of the primary antibody might be adversely affected by labeling with enzymes or tags.
- Labeling primary antibodies for each specific ELISA system is time-consuming and expensive.
- No flexibility in the choice of primary antibody label from one experiment to another.
- Minimal signal amplification.
2. Indirect ELISA
For indirect detection, the antigen-coated to a multi-well plate is detected in two stages or layers. First, an unlabeled primary antibody, which is specific for the antigen, is applied. Next, an enzyme-labeled secondary antibody is bound to the first antibody. The secondary antibody is usually an anti-species antibody and is often polyclonal. The indirect assay, the most popular format for ELISA, has the advantages and disadvantages:
Advantages:
- A wide variety of labeled secondary antibodies are available commercially.
- Versatile because many primary antibodies can be made in one species and the same labeled secondary antibody can be used for detection.
- The maximum immunoreactivity of the primary antibody is retained because it is not labeled.
- Sensitivity is increased because each primary antibody contains several epitopes that can be bound by the labeled secondary antibody, allowing for signal amplification.
Disadvantages:
- Cross-reactivity might occur with the secondary antibody, resulting in nonspecific signals.
- An extra incubation step is required in the procedure.
3. Sandwich ELISA
Sandwich ELISAs typically require the use of matched antibody pairs, where each antibody is specific for a different, non-overlapping part (epitope) of the antigen molecule.
A first antibody (known as capture antibody) is coated to the wells. The sample solution is then added to the well. A second antibody (known as detection antibody) follows this step to measure the concentration of the sample. This type of ELISA has the following advantages:
- High specificity: the antigen/analyte is specifically captured and detected
- Suitable for complex (or crude/impure) samples: the antigen does not require purification before measurement
- Flexibility and sensitivity: both direct or indirect detection methods can be used
4. Competitive ELISA
The key event of competitive ELISA (also known as inhibition ELISA) is the process of competitive reaction between the sample antigen and antigen bound to the wells of a microtiter plate with the primary antibody.
First, the primary antibody is incubated with the sample antigen and the resulting antibody-antigen complexes are added to wells that have been coated with the same antigen. After an incubation period, any unbound antibody is washed off. The more antigen in the sample, the more primary antibody will be bound to the sample antigen.
Therefore, there will be a smaller amount of primary antibody available to bind to the antigen-coated on the well, resulting in a signal reduction.
The main advantage of this type of ELISA arises from its high sensitivity to compositional differences in complex antigen mixtures, even when the specific detecting antibody is present in relatively small amounts.


ELISA Data Interpretation
The ELISA assay yields three different types of data output:
1. Quantitative
ELISA data can be interpreted in comparison to a standard curve (a serial dilution of a known, purified antigen) to precisely calculate the concentrations of antigen in various samples.
2. Qualitative
ELISAs can also be used to achieve a yes or no answer indicating whether a particular antigen is present in a sample, as compared to a blank well containing no antigen or an unrelated control antigen.
3. Semi-Quantitative
ELISAs can be used to compare the relative levels of antigen in assay samples since the intensity of the signal will vary directly with antigen concentration.
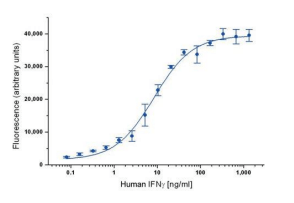
ELISA data are typically graphed with optical density vs log concentration to produce a sigmoidal curve as shown below. Known concentrations of antigens are used to produce a standard curve and then this data is used to measure the concentration of unknown samples by comparison to the linear portion of the standard curve.
It is the relatively long linear region of the curve that makes the ELISA results accurate and reproducible. The unknown concentration can be determined directly on the graph or with curve fitting software which is typically found on ELISA plate readers.
Sample Preparation
The procedure below provides general guidance for the preparation of commonly tested samples for use in ELISA assays. At Booster, we are working on our detailed sample preparation protocols that cover more than 20 sample types and expecting to update this handbook soon. Please check with the literature for experiments similar to yours for your new assay development. Generally:
- Protein extract concentration is at least 1-2 mg/mL.
- Cell and tissue extracts are diluted by 50% with binding buffer.
- Samples are centrifuged at 10,000 rpm for 5 min at 4°C to remove any precipitate before use.
1. Cell Culture Supernatants
Centrifuge cell culture media at 1,500 rpm for 10 min at 4°C. Aliquot supernatant immediately and hold at -80°C, avoiding freeze/thaw cycles.
2. Cell Extracts
Place tissue culture plates on ice. Remove the media and gently wash cells once with ice-cold PBS. Remove the PBS and add 0.5 ml extraction buffer per 100 mm plate. Tilt the plate and scrape the cells into a prechilled tube. Vortex briefly and incubate on ice for 15-30 min. Centrifuge at 13,000 rpm for 10 min at 4°C (this creates a pellet from the insoluble content). Aliquot the supernatant into clean, chilled tubes (on ice) and store samples at -80°C, avoiding freeze/thaw cycles.
3. Conditioned Media
Plate the cells in complete growth media (with serum) until the desired level of confluence is achieved. Remove the growth media and gently wash cells using 2- 3 mL of warm PBS. Repeat the wash step.
Remove the PBS and gently add serum-free growth media. Incubate for 1-2 days. Remove the media into a centrifuge tube. Centrifuge at 1,500 rpm for 10 min at 4°C. Aliquot the supernatant and keep samples at -80°C, avoiding freeze/thaw cycles.
4. Tissue Extract
Mince tissue on ice in the ice-cold buffer, preferably in the presence of protease inhibitors. Place the tissue in micro-centrifuge tubes and dip into liquid nitrogen to snap freeze. Keep samples at -80°C for later use or keep on ice for immediate homogenization.
For every 5 mg of tissue, add 300 µL of extraction buffer to the tube and homogenize:
- 100 mM Tris, pH 7.4
- 150 mM NaCl
- 1 mM EGTA
- 1 mM EDTA
- 1% Triton X-100 0.5%
- 0.5% sodium deoxycholate
(This portion of the buffer can be prepared ahead of time and stored at 4°C. Immediately before use, the buffer must be supplemented with phosphatase inhibitor cocktail [as directed by manufacturer], protease inhibitor cocktail [as directed by manufacturer] and PMSF to 1 mM to generate a complete extraction buffer solution.)
Rinse the blade of the homogenizer twice with 300 µL extraction buffer. Place the sample on a shaker at 4°C for 2 hours.
Read more: C-Reactive Protein (CRP) Metode ELISA
Centrifuge the sample for 20 min at 13,000 rpm at 4°C. Aliquot the supernatant into pre-chilled tubes sitting in ice. Keep the samples at -80°C, avoiding freeze/thaw cycles.
Note: Lysis buffer volume must be determined according to the amount of tissue present. The typical concentration of final protein extract is at least 1 mg/mL.
FAQs
1. The ELISA protocols do not recommend shaking during incubations. Have you tested shaking and decided against it or is it unnecessary?
We tested our protocols with and without shaking during incubations and determined that there is no difference between the two approaches. Therefore, we believe that shaking is not necessary.
2. Is your ELISA kit suitable for use with tissue lysates? If so, what are the protocols?
Theoretically, our ELISA kit can work with tissue lysates. Our general sample preparation protocol for tissue lysates is as follows:
- Rinse the tissue with PBS to remove excess blood.
- Chop the tissue into 1-2 mm pieces.
- Using a tissue homogenizer, homogenize the samples in PBS or lysate solution such as the Mammal Tissue Protein Extraction Reagent (Boster Bio Catalog Number AR0101) at a ratio of 10 mL lysate solution to 1 g of tissue.
- Centrifuge the homogenates at approximately 5000 x g for 5 min.
- Assay immediately or store the homogenates at -20°C (avoid repeated freeze-thaw cycles).
3. My samples contain very low cytokine concentration. What is the minimum concentration that can be measured with confidence using your ELISA kits?
Low cytokine concentrations are typical for many biological samples. When determining the minimum concentration that can be reliably measured by ELISA, consider the following:
- The standard curve: As the concentration range of ELISA is typically 0 – 1000 pg/mL, the data points on the standard curve for this range correspond to 0, 15.6, 31.25, 62.5, 125, 250, 500, and 1000 pg/mL.
- The assay sensitivity: Boster’s Picokine ELISA kits typically have a reported sensitivity of 10 pg/mL. The concentration detected in many biological samples will fall between the 0 and 15.6 pg/mL data points of the standard curve. As long as the value detected is above the statistical sensitivity of the ELISA, (e.g., 5 pg/mL or greater), the value is statistically significant. Results below this detection limit are of questionable validity.
4. Is your ELISA kit suitable for use with tissue homogenates?
For most cases, yes. If there is enough target protein present in the tissue of interest, the ELISA kit will work. Also, if there are a known alternative processing of the protein in a specific tissue that results in protein reactivity change to the kit, we will note it in our product datasheet.
5. Is your ELISA kit suitable for use with any non-validated sample types?
In order to use an ELISA kit with a non-validated sample type, it is necessary to perform a spike and recovery study to determine if a non-validated sample type will work with a particular kit. To do this:
- Divide the sample into two aliquots.
- In one of the aliquots, you should “spike in” a known amount of the kit standard.
- Perform a dilution series to compare the spiked to the unspiked sample.
6. What are the differences between the sandwich ELISA and competitive ELISA?
Sandwich ELISAs typically require the use of matched antibody pairs, where each antibody is specific for a different, non-overlapping part (epitope) of the antigen molecule. A first antibody (known as capture antibody) is coated to the wells. The sample solution is then added to the well. A second antibody (known as detection antibody) follows this step in order to measure the concentration of the sample. Higher signal output reflects higher concentration of the target antigen in the sample.
The key event of competitive ELISA is the process of competitive reaction between the sample antigen and antigen bound to the wells of a microtiter plate with the primary antibody.
First, the primary antibody is incubated with the sample antigen and the resulting antibody–antigen complexes are added to wells that have been coated with the same antigen.
After an incubation period, any unbound antibody is washed off. The more antigen in the sample, the more primary antibody will be bound to the sample antigen. Therefore, there will be a smaller amount of primary antibody available to bind to the antigen coated on the well, resulting in a signal reduction.
7. Why do my wells turn green after I add the stop solution?
The green color is a result of incomplete mixing between the substrate and stop solution. After adding the stop solution, gently tap the plate or place it on a shaker until the mixture in the wells turns yellow.
8. Why does a brown or orange-brown precipitate appear in my wells after adding the stop solution? How can I resolve this issue?
The precipitate is a result from insufficient washing after incubation with the HRP- labeled detection antibody. To resolve this issue, perform a 30-second soak during each wash step followed by a complete removal of all liquid in the wells.
9. If I don’t use all the wells from a microtiter plate for my current ELISA assay, how can I preserve the unused wells for future use?
The microtiter plate typically has removable strips of wells. Unused wells may be removed from the plate, returned to the foil pouch containing the desiccant pack and stored at 2-8°C for up to one month.
Refference: Boster Biological Technology


